This is an old revision of the document!
Input Data Setup
Although basically the sequence of steps in setting up a BIO-met simulation is not relevant, we will follow a typical step-by-step process from which we think it makes most sense. The steps are the same for all available thermal comport indices. So, let's begin with defining our input data and calculation range.
Selecting the Data Source
As mentioned in the overview, a valid ENVI-met microclimate simulation is the indispensable presupposition for any BIO-met simulation. Errors and wrong assumptions in the microclimate simulation will result in wrong and erroneous BIO-met results.
To link with you simulation output, select the Root Output Folder of the simulation by pressing the highlighted button.
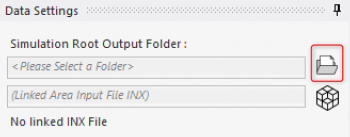
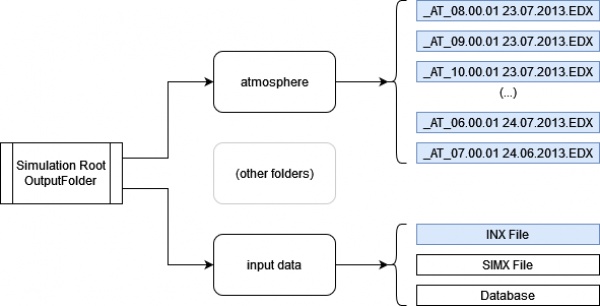
The complete output folder of a simulation contains a large set of different folders and data as described here. From these folders, the \atmosphere and the \input data folder are required for a BIO-met simulation.
(For the biometeorological calculations in BIO-met V5.1, only the \atmosphere folder is needed. The \input data folder might be missing)
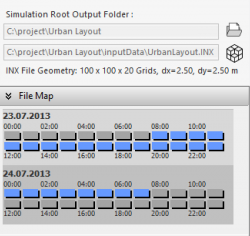
After selecting the root output folder, the content of the \atmosphere folder is scanned and the available files are displayed in the File Map. Missing files will be shown in Gray, existing files in Blue.
Selecting the Time Range
After the output folder has been selected and read, the Time Range of the simulation must be set using the Data File Map. You can select a single file using the left mouse button, a set of single files by pressing SHIFT and the left mouse button or select a continuous time range by defining the first and the last time slice to be simulated. For the latter operation, right click the Data File Map graphics and select the required command.
In the example below, we have selected a time range starting at 10:00 and ending at 20:00 hours of the first day. These two times plus all available time steps in between will be calculated in the simulation.
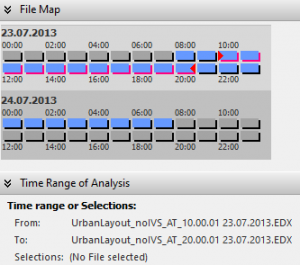
As additional information, below the Data File Map, the actual selection or the start time file (from:) and end time file (to:) or the individual selection are/is shown as text.
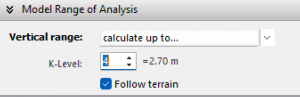
Selecting the Spatial Range